After you install PrintMessenger, you can start using it to convert documents on your computer to PDFs and upload them to the site. (You may also be able to save the PDFs on your computer and upload them later.)
Note: The procedure for using PrintMessenger on a Windows computer and on a Macintosh computer is very similar. Any differences are described in the steps that follow.
1. Make sure that the document or file that you want to convert is open in the application that you used to create it (for example, Microsoft® Word or Adobe® PhotoShop®).
2. In the application, select File > Print.
3. If your document is to be printed on standard size paper (typically letter size):
● Select MarketDirect PackCentral as the "printer" and click OK or Print (depending on the application).
The system converts the file to PDF format, after which the EFI PrintMessenger window opens and lists the PDF.
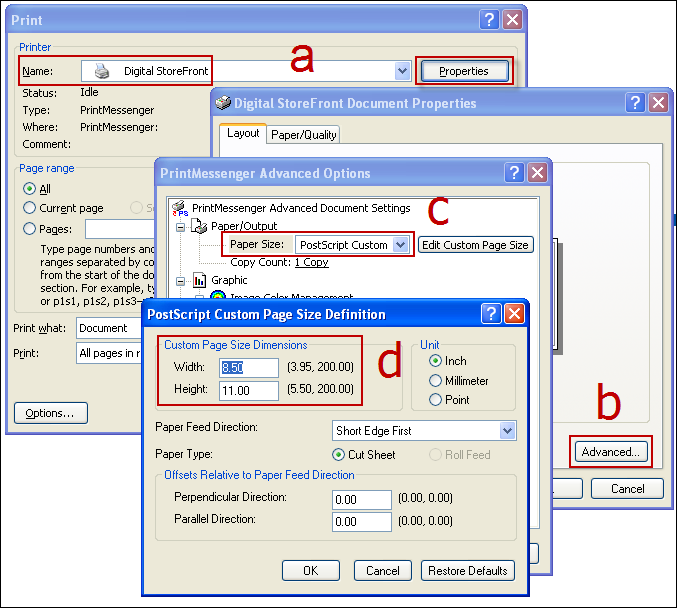
On a Windows computer – if you need to review or select the paper size for the document:
Note: The selections you make may be slightly different depending on the version of Windows you are using.
a. Select MarketDirect PackCentral as the "printer" and click Properties.
b. Click Advanced.
c. In the Paper Size field, select the size you want. If the size you want is not listed, select PostScript Custom Size.
d. If you selected PostScript Custom Size, enter the dimensions of your custom page and then click OK in all the dialog boxes.
The system converts the file to PDF format, after which the EFI PrintMessenger window opens and lists the PDF.
On a Mac computer – if you need to select the paper size for the document:
a. In the Print window, select MarketDirect PackCentral as the “printer.”
b. In the Paper Size field, select the size you want. If the size you want is not listed, select Manage Custom Sizes.
c. In the Custom Paper Sizes window, enter the dimensions of your custom page and click OK.
The system converts the file to PDF format, after which the EFI PrintMessenger window opens and lists the PDF.
4. To convert more files, repeat steps 1 to 3. (You must wait for the conversion of a file to be complete before you can convert another file.)
The PrintMessenger window looks like this in Windows:
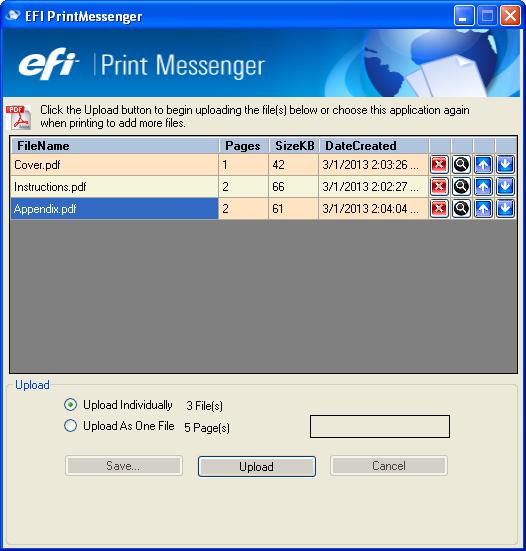
On a Windows computer, you can:
● Use the buttons to the right of a selected file to delete or preview the file, or to move the file up or down in the list. (The order in which the files are listed is the order in which they are merged – and printed – if you select Upload As One File.)
● Rename a file by double-clicking its name and making your changes. (A .pdf extension is automatically added to the file name after you make your changes.)
The PrintMessenger window looks like this on a Macintosh computer:
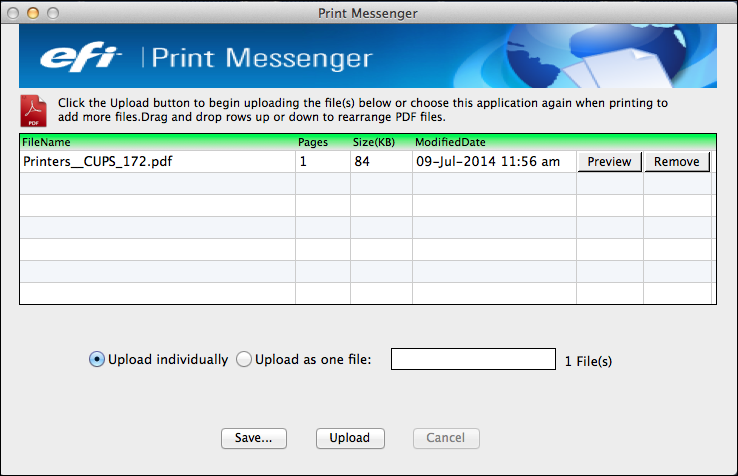
On a Macintosh computer, you can:
● Change the name of a file.
● Click Remove to delete a file or click Preview to view its contents.
Note: If you convert numerous documents and change your mind about uploading them, you can remove all of them by selecting Reset PrintMessenger on the PrintMessenger menu.
● Drag files to change the order in which they are listed. (The order in which the files are listed is the order in which they are merged – and printed – if you select Upload As One File.)
Typically, after you convert your documents to PDFs you upload them to the storefront site so you can start adding them to products.
1. In the PrintMessenger window, either select Upload Individually to upload each file one by one or select Upload As One File to merge the files into a single PDF. For example, you may have files corresponding to parts of a brochure that you want to combine into one PDF.
2. If you selected Upload As One File, replace MergedDoc.pdf (in the field to the right of Upload As One File) with a descriptive name for the merged file.

3. Click Upload.
4. If the Login window opens:
● If you already have an account (are registered), enter your account credentials (user name and password) for the site and click Login.
● If you do not have an account yet, click Open an Account.
Tips:
●
When in the Login window, select the Save
credentials and auto login check box if you want to avoid being
prompted for your account credentials during future file upload sessions.
If you save the credentials on a Macintosh computer and later want to
change them, click Reset Auto Login
on the PrintMessenger menu.
●
On a Windows computer, you can always open the Login window by right-clicking
the PrintMessenger icon ![]() on
the right side of the Windows task bar (at the bottom of the desktop)
and selecting Settings > Login.
on
the right side of the Windows task bar (at the bottom of the desktop)
and selecting Settings > Login.
5. When you are informed the upload was successful, click OK.
6. The Upload Successful page opens. If you want the file(s) that you uploaded to be automatically added to products that you create during the current session (until you log off), leave the Automatically add these files to products... check box selected. (Even if the files are added automatically, you can always remove them while customizing a product.)
7. Click Get Started to go to the home page on the site where you can begin selecting products. Note that the Get Started button is not available in some situations. Instead, you are taken directly to the product customization step; no product selection is necessary.
Tip: The PDFs that are uploaded to the site are automatically stored on the site so that you can select them (from your saved files) when customizing products that require content files.
Depending how the site is configured, you may be able to save the PDFs on your computer and upload them to the site later. (You can supply files as you are customizing a product or save your files on the site.)
1. In the PrintMessenger window, either select Upload Individually to save each file separately or select Upload As One File to merge the files into a single PDF. For example, you may have files corresponding to parts of a brochure that you want to combine into one PDF.
2. If you selected Upload As One File, replace MergedDoc.pdf (in the field to the right of Upload As One File) with a descriptive name for the merged file.
3. Click Save, browse to the folder where you want to store the PDFs, and click OK.