Some procedures apply to all objects (images, text, shapes, QR codes) when personalizing SmartCanvas products, although the availability of these procedures depends on the product you are ordering. You may be able to:
● Align and distribute objects
● Arrange overlapping objects (by moving them forwards or backwards)
● Group objects and then move or rotate the group, or apply the same background (fill) color to the entire group
Sometimes it is faster to copy an existing object and then make minor changes to the copy.
1. Do one of the following:
● Select the object you want to copy and press CTRL+C.
● Right-click the object you want to copy and select Copy.
2. Either press CTRL+V or right-click and select Paste.
3. Drag the copied object where you want it and then make further changes as necessary.
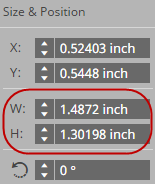
You may be able to re-size objects and move them to a different location.
To re-size objects
If you can re-size objects in a product, you can do so in one of two ways:
● Click the object and use the handles to re-size it.
Note: The object is scaled proportionately unless you press and hold SHIFT while re-sizing it.
● Click
the object and click  on the toolbar. Then adjust
the W (width) and H
(height) measurements. (If the object cannot be re-sized, the W
and H fields will be display-only.)
on the toolbar. Then adjust
the W (width) and H
(height) measurements. (If the object cannot be re-sized, the W
and H fields will be display-only.)
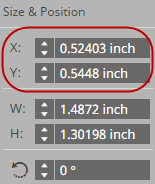
To move objects
If you can move objects around in a SmartCanvas product, you can do so in one of two ways:
● Click the object and drag it from the inside to where you want it.
● Click
the object and click on the toolbar. Then adjust
the X and Y
measurements to specify the position of the object relative to the X axis
and Y axis. (If the object cannot be moved, the X
and Y fields will be display-only.)
You may be able to rotate objects in a SmartCanvas product.
1. Click
the object you want to rotate and click on the toolbar.
2. Change the degree of rotation (0° means no rotation). (If the object cannot be rotated, these buttons are display-only.)

Tip: You can also group objects and rotate them all in one step.
If you added objects or moved objects around, you may want to align them the same way, for example, aligned along their left edges or centered. You may also want to distribute objects evenly across the page (horizontally) or down the page (vertically).
1. Click the first object, press and hold SHIFT or CTRL, and then click each additional object you want to align or distribute at the same time. The selected objects are now enclosed in a frame.
2. To
align objects, either click  on the toolbar displayed next to the selected objects or right-click and
select Alignment. (The choices
you will get are slightly different.)
on the toolbar displayed next to the selected objects or right-click and
select Alignment. (The choices
you will get are slightly different.)
3. If
you clicked , click one of the alignment buttons
to align the objects along their top, bottom, left, or right edges, by
their middles, or centered.

4. If you right-clicked and selected Alignment:
a. Select Relative to page if you want the alignment to be relative to the page.
b. Select Align left, Align center, or Align right. The objects will now all be left-aligned, centered, or right-aligned relative to one another. If you selected Relative to page, the alignment will also be relative to the page.
5. To distribute the selected objects evenly across or down the page:
a. Right-click and select Alignment.
b. Select Relative to page.
c. Select Distribute Horizontally (evenly across the page) or Distribute Vertically (evenly down the page).
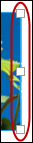
In a SmartCanvas product you can put objects on top of other objects so they partly or completely overlap. You can then move an object forwards or backwards to control what is visible. For example, you could add some text and then decide to put a colored rectangle behind it as background. If you place the rectangle over the text and fill it with color, the text will no longer be visible. In this situation you must move the rectangle to the back so the text is visible again.
You can have multiple layers of overlapping objects.
Note: Only objects that you added yourself can be moved in front of or behind other objects. You cannot do this with objects that are part of the original product.
1. If you have overlapping objects and want to arrange how they are displayed in relation to one another, select one of the objects.
2. Do one of the following:
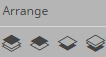
● Click
 on the toolbar next to the object and then click one of the Arrange
buttons to:
on the toolbar next to the object and then click one of the Arrange
buttons to:
● Bring the object to the front (move the object on top of all the others)
● Bring the object forward (if you have several overlapping objects, move the selected object forwards one layer)
● Send the object backward (if you have several overlapping objects, move the selected object back one layer)
● Send the object back (move the object below all the others)
● Right-click the object, select Arrange, and then select one of the following:
● Bring to front
● Bring forward
● Send backward
● Send to back
Note: If the Arrange buttons are unavailable or Arrange is unavailable on the menu, you cannot move the object backwards or forwards.
In SmartCanvas products you can group some objects together and then move or rotate all the objects in the group at the same time. You can also apply the same background (fill) color to all the objects in the group. For example, you may have some text, a line, and a rectangle that you want to move to one corner of the product and then rotate them the same way. By grouping these three objects, you can move them in one step and rotate them in another step, instead of moving and rotating each object individually. Also, if you rotate a group of objects, the system ensures they are rotated as group, with all the objects in the group turned at the same angle.
1. Click the first object, press and hold SHIFT or CTRL, and then click the other objects you want in the group. A frame with handles surrounds the objects but they are not yet grouped.
2. Right-click and select Group or press CTRL+G. The objects are now grouped.

3. Do any of the following to the group (depending on what the product allows):
● Re-size the group using the handles.
● Drag the group to a different location.
● Rotate
the group by clicking on the toolbar and then changing
the degree of rotation. 0° means no rotation.
● If
you want the same background (fill) color for all the objects in the group,
click  and select a color. (If a color was already
selected, the button reflects it, for example,
and select a color. (If a color was already
selected, the button reflects it, for example,  .)
.)
Tip: You may be able to customize colors.
4. After you finish working with the group of objects, ungroup them by pressing SHIFT+CTRL+G or by right-clicking and selecting Ungroup.
Note: If you leave the objects grouped, they will continue to be treated as a group, which you may not want.
You can always delete an object you added, and you may be able to delete an object that came as part of the product.
1. Click the object you want to delete.
2. Click
![]() on the toolbar.
on the toolbar.
See also
● Working with images in SmartCanvas products
● Working with text in SmartCanvas products